
Since Grenadine advised us to go to Cassia so that’s where we will go. When you reached Cassia, walk to Port Pescato (you can’t warp there). Det. Beignet is at the entrance and will thank you but there is problem since someone trying to after the hidden treasure on the eastern island.

Go east part of the town and walk to the port area. There, you will see Caldarroste and Lord Persimmon. Talk to Caldarroste and he will bring you to other side of the island.

Over here, you can collect all the ‘Rainbow Shell’ here. Anyway, head east from where you are and go north when given the chance. Caldarroste will appear and then barge through the gate leaving you behind. You have no choice but to take another path. Exit that map then continue south.

Open the treasure chest which look like a clam to get ‘Putty Pea’. Collect the rainbow shell if you want to. Continue the path until Parfait appear. Follow him east.

Talk to Pickles and answer Yes to get ‘Brawly Book’. Talk to him again to get ‘Scampi Ball’ for the skill. You can give him item to upgrade the ball as well. Enter the academy.

Once inside, go through the door in the middle. Talk to the headmaster. After the conversation, exit the room and go through the door on the right. Parfait will talk talking to you and when you gain control of your character. Exit the academy and follow Parfait heading north.

Parfait will explain the situation to you. Head east to another map. Follow the map and collect ‘Rainbow Shell’ and tails while on the way. Exit north.

Head east as west lead to dead end. Then, follow the path until you spot Caldarroste. Talk to him. Head west to the outer area of pyramid. Talk to any one of the space police to initiate battle.

3 Sergeant:
Sergeant has two type of defense skills. One of them is Magic Guard which increase their magic defense. Another one is Technique Guard which increase their physcial defense. Their attack skill is called Charge. Charge causes damage of 150+. If your character element is Dark, it can cause damage up to 200+.

Enter the opening on either left or right since they will lead to the same place. Once inside, head north when given the chance. Again, you can go either east or west to reach a staircase. Both of them will lead to the same place. Head south and collect tails from both corner before exiting south.

Once more, head either east or west then north down the stairs. In the second level, head north if you want to collect tails. If not, continue south. Continue the path and head north through the door.

Walk slightly north, then head east or west around to collect ‘4 Sugarstars’, ‘Sandals’ and ‘2800 bira’. Go back to the entrance area then head north through the door.

Inside the room, you will spot Parfait. Head up near the pot and use Pico’s fire magic. Exit the pyramid, go up the stairs and talk to the space police to initiate battle. Enter the pyramid from either side.

Go to the top middle area to initiate conversation with Parfait. Top right corner chest contain ‘3500 bira’ while top left corner chest contain ‘Putty Pea’. Grab both of them before entering the door near Parfait. Go near the steps and you will be engage into battle.

Demat:
Demat has a very irritating skill called Sweet Nothings. This skill make your character charmed and there is no way to heal them. If any of your character is charmed, you cannot attack Demat. Demat has another skill named Forested Field. It causes damage from 70+ for four times. It sometimes causes sick status.

After the battle, they will all escape. Enter the room and Caldarrost will escape with the water gummy. Exit the pyramid and follow him west.

Follow the path and you will spot him with Lord Persimmon. Follow Lord Persimmon to get back the water millenium gummy! Parfait will snatch back the water gummy from Lord Persimmon. Return to the academy to talk to the headmaster.

Talk to headmaster again when you regain control. After that, talk to Parfait to rest for the day. The next day, Det. Beignet will come in and ask you to go to Tropica. I guess Gren is our next destination.

Once reached Gren, go to Tropica Village and head to Master Drum’s house and talk to the one inside then head back out. Head into the forest to run into Abalon Demar.

Follow the path and exit southeast. Go south and you will spot Semolina on your east. Go near her and she will run away while blocking the path with her magic.

Since all the path is blocked, exit north. Sorbet will noticed the opening so head through there. Follow the path until Mokka stop you. Go near the fountain and use Sorbet’s water magic. After that, use Mokka’s earth magic. Finally, use Lassi’s wind magic.

Exit north. Head west when the path split then follow the path. You will spot group of salamander outside the gate of Assam. Head inside and you will be ambushed by otters. Defeat them and another group of otters will initiate battle with you.

They will ask for your forgiven after losing the battle. Saying Yes will allow you to continue while saying No will make you battle again. Talk to the otter at the north gate. First answer Yes then answer Are Buried Deep.

Head north and go into the opening to reach Holy Tree Ygdrassil. You can catch the blue frog here. Climb the vine on the most left and follow the path. Then try to climb the vine on the southeast and a treasure chest will fall. Head back to the map with the marker otter then climb the right most vine.

Follow the path and climb the vine beside the marker otter. Head all the way west and go north to climb the vine to open the treasure chest containing ‘Golem Clogs’. Head back to the split and go east this time and up the vine.

In this floor, first head east and follow the path to climb the vine. Then go near the vine and a treasure chest containing ‘Red Worm’ will drop. Open it then head back to the split and head west up the vine.

Go slightly south and climb down the vine to open the treasure chest containing ‘Leaf Hat’. Head back up and climb the vine right next to the marker otter. Follow the path and climb up the vine.

Head west in the split then climb up the vine. Go south to climb down the vine to open 3 treasure box. Head back to the split. Head north and climb the vine next to the marker otter. Head west and go down the vine. Open four treasure chest in this room and head back up.

Now head to the right most vine and climb down to open two treasure chest containing ‘1800 bira’ and ‘Putty Pea’. Head back up and go south down vine to open treasure chest with ’88 bira’ and ‘Putty Pea’. Heack back up and go west then slightly north to climb the vine beside the marker otter.


In this map, most of the vine will just fall off. Only four of them will not. Two of them will make enemies fall down, one more will drop treasure chest while the last one will allow you to go to another map. Climb this vine to another map.

Here go west and climb the vine. There are treasure chest with ‘Sun Shirt’, HP Pot and MP Pot. Use them as you wish and head back. Talk to otter to battle them. Go through the opening. After the scene, head north to the opening. When you gain control of your character, talk to Pico and answer Yes. You will then be engage into battle with Holy Sapling.

Holy Sapling:
This is the toughest boss so far! I have really tough time beating this boss… Holy Sapling always start out with Unrip Fruit which cause damage around 390+ for one character. It has another skill called Briar Patch which inflict 380+ to one character. Holy Sapling has one attack which does damage to everyone and to about 180+ damage called Bloom of Plenty. Another skill of Holy Sapling is Celestial Swap.

There will be a long scene after the battle and you will gain ‘Wood Gummy’. Another scene will take place in Tropica Inn. After all that, exit the town to go to where the rocket is. Outside of the rocket, there are two people. Talk to them and you will have to bring the spiny mole back to its home in Erd. So, I suppose Erd is where our next destination.


Once reach, the spiny mole will thank you and ran off. Head east to enter Rio Villa. If you enter the house with the moon on top, talk to the robot on the top floor to get the code to see Emerald Core.

Enter the second house on the left, go to the door on the left side and input the right access code. Examine the computer and read all the file. Mokka will then ask you to read the Program Pattern part under Robotics again. Do so then exit the house.

Mokka isn’t with you when you exit the house. Reenter and talk to Mokka. Mokka need to be fully charged so lets head to Kahve Ruins. Exit the town due east. Continue east until given the chance to go north.

Keep going north until you reach the outside of Kahve Ruins. Talk to the robot outside and enter when given the opportunity. Continue going north going through the door in the middle. Take the right door since the left one couldn’t be open.

Go through the middle door and you will reach a strange room. Go around the room to collect items from 3 treasure chest. Talk to Mokka and he will join the party. Go to the opening on the left of Rogan and top of Chai to recharge Mokka’s battery core.

Go back to the first floor and enter the door on the left which we cannot go through previously. Follow the path until a room with a weird thing in the middle. Inspect it and get ready to battle.

Gummy Girl :
Gummy Girl is quite a strong opponent but not as difficult as Holy Sapling. Anyway, she uses several skills. One of them is Clinging which cause 180+ damage to one person. Another skill is Scream which cause 100+ damage to everyone. Lastly is Gummy Shot. This skill is quite irritating since it changes the position of the character. It sometimes also inflict Curse to characters. The damage done by this skill is 130+.
Using Chai’s Parsley Wall can reduce the damage inflict by Scream and Clinging. Without Parsley Wall, Scream cause damage to about 100+ but with Parsley Wall, the damage reduce to about 35+.

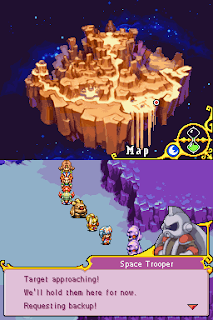
Exit Kahve Ruins and talk to Rogan. When the reach the split to go Rio Villa, take the east turn instead. Space Police will fly in and initiate battle with you.

There are three treasure chest here; ‘300 bira’ in the chest on the bottom left, ‘Putty Pea’ in the chest on the bottom right while ‘1600 bira’ in the chest on the top right. After collecting them, approach the space trooper and talk to them to initiate battle.

Head east after defeating them. Follow the path and grab the tails and loot in the chest as well as worms. Exit due north.

Approach the building and Mokka will open the door. Enter and go near the machine. Use Lassi’s wind magic and you will eventually arrived at Uponisbak. You can talk to them to get ‘Pyrite’. Anyhow, go to the middle and try to enter the hole.

Once inside, you can choose to head either east or west and it will lead to the same place. However, taking east will allow you to buy and sell things. When you reach the area (like the picture), tap on the wall and choose Yes. The wall will crumble and you can go through the area.

Follow the path until it split. Continue east and go south when given the chance. Ignore the first turn to the west and continue going until you reach a treasure chest containing ‘5200 bira’. Grab it and head back to the second split. Instead of heading south, this time go east and grab ‘Clockwhistle’ from the treasure chest.

Go back west and head north when given the chance. Go southwest when the path split. Head west when give the chance to open the threasure chest containing ‘5 Melon Jams’. Go back to the split and head northwest this time. Open the treasure chest containing ‘5 Nut Spreads’. Back in the split, head northeast this time and follow the path.

You will reach a room full with treasure chest. Open all of them to get ‘3 Thunder Bombs’, ‘1200 bira’, ‘3200 bira’, ‘Ice Cube’, ‘Putty Pea’, ‘Berry Jam’ and ‘Putty Pea’. Exit due north. Continue and climb up the rope.

Tap on the egg-like thingy in the middle. Then, talk to person right next to it. After all the talk, use any one of their magic and it will attract Muzzleflash’s attention. Climb up the wall using the ladder on the left side of the room. Get ready for a battle with Muzzleflash.

Magnus Muzzleflash :
This guy hits hard. Most of his damage done is 450-580 or so. All of his attack only damage one person. First is Blood Rage which cause 500+ damage. Another attack is Blazing Cannon which cause 500+ damage as well and sometimes inflict Scorch status. He also has Counterattack which does 450+ damage to you when you attack him either using physical or magic attack. Most of the time he will counterattack but sometimes he don’t.
Using Chai’s Parsley Wall helped too. All the attack damage will reduce by using this spell. There’s once where he used Blazing Cannon and it did only 240 damage to Sorbet.

After the battle, go west till you can’t walk anymore. Use Mokka’s earth magic. When you finally gain control of your character, go back to the room and talk to Shallot. You will finally get ‘Earth Millenium Gummy’ and be back outside of your rocket. Enter and you will receive mail from Brie. So, our next destination is Puffoon.

Head all the way east when you reached Puffoon and you will be stopped by Brie. Continue east to Bena Rikashi. Go north to go to the palace area. Talk to King Suspiro. After that, head to Honey Mint.

Talk to Twigadamus. If you look into the orb, you will see the image (just like the picture). There is where you should go. Exit Honey Mint and when you approach the vine on the northwest, Brie will appear and talk to you. Climb the vine and go northeast.

Continue head east and you will see a large bud. Use Chai’s wood magic then climb the beanstalk. Go north and enter the building. It is a
straight forward path so just follow the path until you saw Miss
Madeleine. Then continue the path.

In the following map, go up the ladder on the far right and open the chest to get ‘5000 bira’. Descend and climb the ladder to the left of it. There is a treasure chest containing ‘5 Blue Frogs’ south of where you exit. Descend the ladder on the east. 
Head down the ladder and go east to grab ‘Mardi Mask’ from the chest. Go back to the ladder and head up instead. Go up and you will see an old man, Hp Pot and MP Pot. You can grab the ‘Putty Pea’ from the chest located in the east and tails southwest. Descend the ladder on the southeast. 
Again, it is a straight forward path. Just follow the path until you are given chance you take the ladder up or down. Choose the one leading down asup leads to dead end. Follow the path and exit there for a battle with Brie.

Brie Pourri :
She not a tough opponent at all. Anyhow, she has several skills. First is Cyclone Waltz which remove one character from the battlefor a few turn. Damage done character is 200+. Another attack skill of hers is Sonic Sabre which cause 300+ damage. She also uses Celestial Swap.
After the battle, talk to her. After that, go up the ladder. Continue east then go up the first ladder and grab ‘Putty Pea’ from the chest. Go back to where the three ladder is. Take the ladder heading up on the right if you want a ‘Wakey Tail’ otherwise take the ladder leading down. Follow the path leading to another map. 
Follow the path and you will see another mirage. Continue up the ladder and you will reach an area with 9 set of ladder. Only one ladder lead to another map while the other will lead you back to start of this map. Climb the third ladder from the left.

Heal yourself using HP Pot or MP Pot if you need then enter the building. Follow the path until you see a yellow worm. Tap on it. Talk to Brie after that and choose Yes. Get ready for another boss battle. 
Odd Beetle :
Odd Beetle uses Binding Sickle and cause 390+ damage to one character. Another skill is Sleeping Cocoon which trap one of your character in a cocoon. It will then use Cocoon Bust after a few turn. This attack uses the character which turned into cocoon and cause 300+ damage to everyone. Another attack is Riot Cocoon which also causes 300+ damage to everyone.

Watch the scene and when you finally gain control, grab the ‘Wind Millenium Gummy’. Exit the area and you will see another mirage outside. Head back to the rocket and go to Razen.
No comments:
Post a Comment